Create flow
Our platform is based on workflow for job calculation, so any analysis job must create a flow firstly . If you subscribe to the floe from the community, you can skip this step. If you subscribe to a tool, you need to build an analysis flow based on the tool. When creating a job, the first step is to select a flow, so if you only want to run a single tool, you also need to make this tool into a flow. Similarly, you can connect multiple tools in series to complete the production of complex flow. We click the ‘Flow’ button in the project navigation bar in the project, and then click the ‘Create flow’ button on the right to create a new flow.
There are 3 sections on the page that need to be edited, Flow name / Flow path construction / Description.
| Type | Description |
|---|---|
| Flow name | edit the name of the flow, it cannot be the same as other flows. |
| Flow path construction | Select a specific version of the tool on the left, click and drag it to the right, connect the port on the tool to complete the flow construction |
| Description | Flow description, markdown editor. It can be edited according to the provided template. |
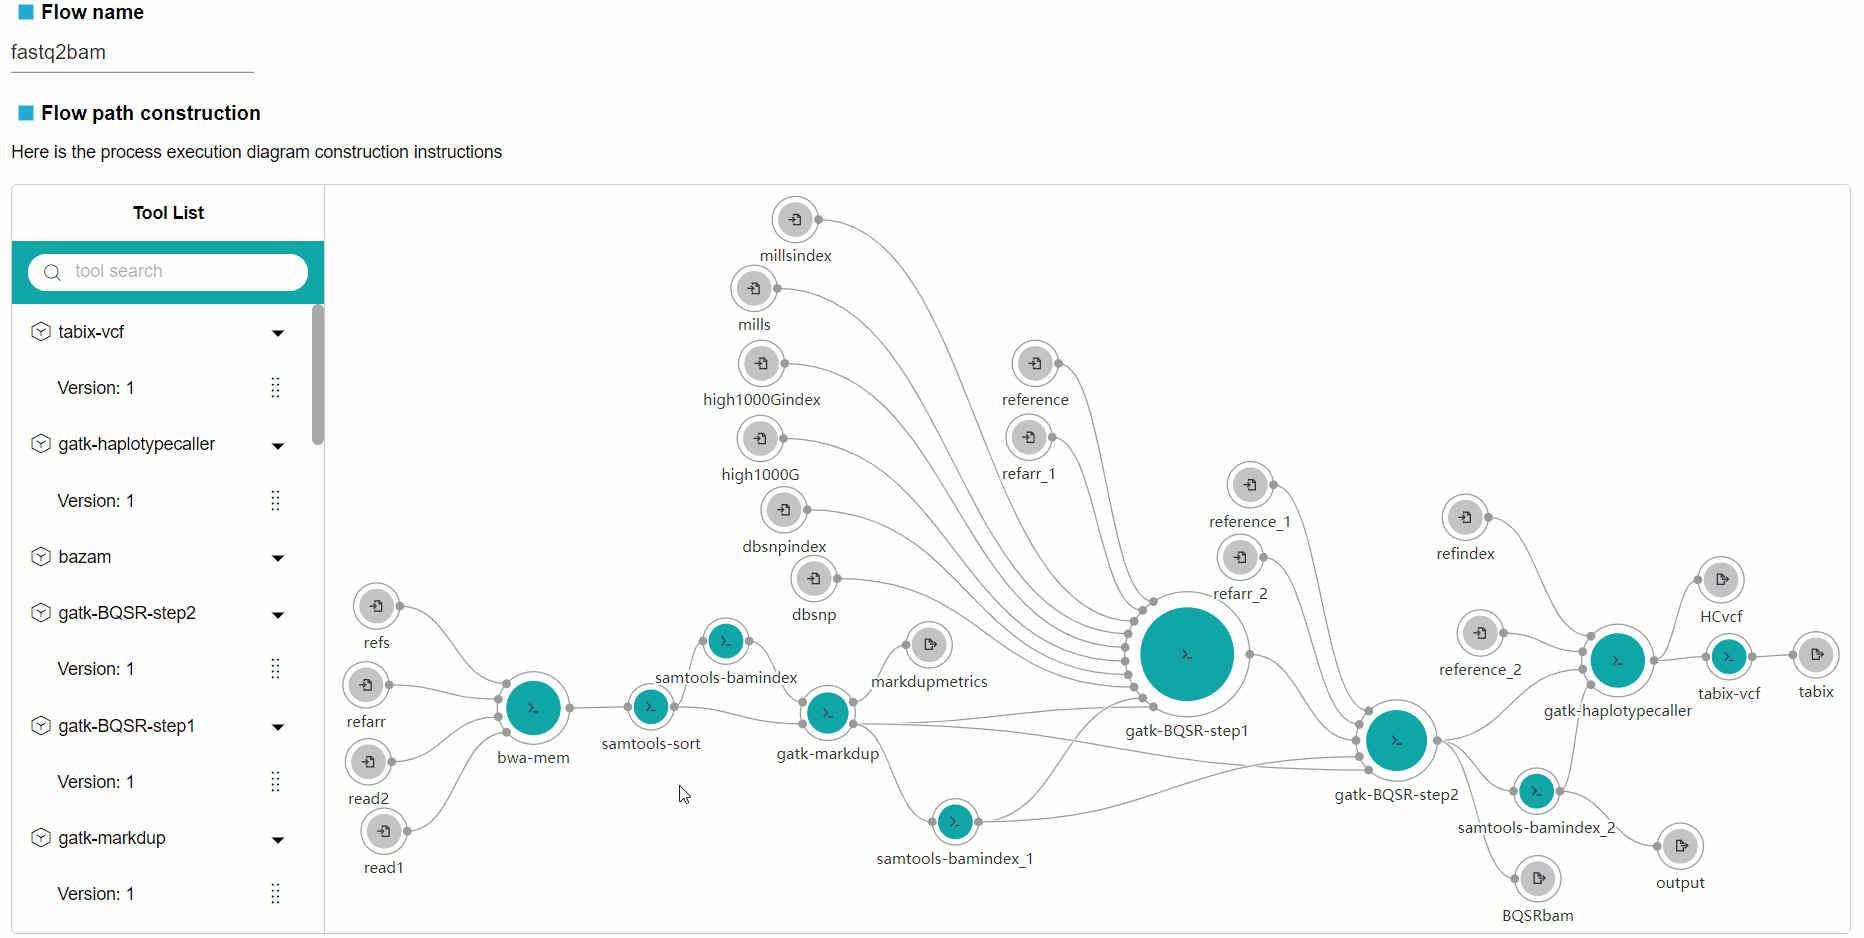
Take the 3 tools as an example, our flow’s name is set ‘tofastq2bam’. The construction method of our Flow path construction is shown in the figure below.
Here we can see that when the tool is dragged into the canvas on the right, ports will appear on both sides of the tool. The port here is a one-to-one correspondence between the input file and the output file, which is exposed by the tool to the user for connection, indicating the flow of the file.
For the flow’s construction , users can quickly understand the input and output files of the tool through the port, so that multiple tools can be connected in series. Click the port on the left side of the tool and drag it to the blank space, indicating that the port needs file input, click the port on the right side of the tool and drag it to the blank space, indicating that the port file will be finally output.
The connection line between tool A and tool B means that the output file of tool A will be used as the input file of tool B. At this time, it should be noted that the file format of the output file of tool A must meet the requirements of the input file format of tool B.
The connection between tool A and tool B only represents the flow of the file from tool A to tool B, and will not be used as the final output of the flow. If you want the file to be output, you can drag another one on the output file port of tool A ,and it is not connected to any tool, it will be recognized by the system and output as the final output file.
We can also create a relatively complex flow.

After constructing the flow chart, if you need to modify specific tool parameters, you can also click the icon of the specific tool in the canvas, click the settings icon, and configure further tools in the pop-up box. Here are mainly the parameter items of the configuration tool and the computing resources required by each tool. You can adjust it according to the author's instructions. If you don't adjust it, you will be analyzed according to the default parameters.
The following is the description of the fields in the tool configuration item:
| Type | Description |
|---|---|
| Top instructions | Instructions for using the tool |
| CMD | The command line when the CMD tool is running (it is described detail in the document of ‘how to make a tool’, if you only run the tool, you don’t need to understand it). |
| param list | parameter list, including input and output information and tool parameters. |
| prefix | Whether there is a prefix in the command line (it is described detail in the document of ‘how to make a tool’ , if you only run the tool, do not need know about it. |
| type | Type of data ,such as number, character string , input file , output file . |
| key | The description of the key parameter, it is unique and cannot be repeated. Generally, the key is used in the description to tell the user the function of the parameter and how to set it. |
| value | Value parameter setting, users can modify the type (Number and String) . |
| is select | Whether the parameter is required when running the tool, a check indicates means required, and the required parameter must be checked. For identifying parameters, you can use this option to determine whether the parameter is required. |
| input / output | input file / output file |
| dir | The location of the subfolder where the input/output files are placed in docker (it is described detail in the document of ‘how to make a tool’, if you only run the tool, you don’t need to understand it). |
| port | Port name, the name of the port displayed in the flowchart, to inform the user of the file content that this port needs to input/output. |
| type | Type of file, item means single file input/output, array means this port can input/output multiple files at the same time. |
| pattern | The suffix of the pattern file, such as .csv, means that only the input/output of the csv file format is supported. * means the default indicates that any file format input/output is supported. |
| Computer selection | The computing resources required by the docker tool. |
| CPU | Number of CPU |
| RAM | Maximum RAM dependency |
| DISK | Maximum disk storage |